Basic QL1 and Rio Dante Setup Document
Basic QL1 Rack Dante Setup to review.docx
Basic QL1 and Rio Dante Setup
This guide is meant to be a quick reference for troubleshooting and setting up in the field. We are covering small daisy chain configurations. For more robust systems, it is recommended to use redundant networks in a star configuration. For setting up more complex Dante systems, please consult the manufacturer’s published manuals found below.
I also highly recommend taking the FREE Dante Level 1 Certification course which you can find here.
It should be noted that our Dante networks are configured with DHCP and not static IPs.
This manual will not be going over Dante Controller, but it is highly recommended to connect a laptop with Dante Controller into the network for monitoring, troubleshooting, and quicker settings changes. To do this with our basic setup, connect from the QL1s Secondary port into your laptops ethernet port.
This manual will not go into adding the Shure ULXD units into the network, but the settings configured here are made to accommodate any technicians who want to do so. For configuring the ULXD units consult the manual here.
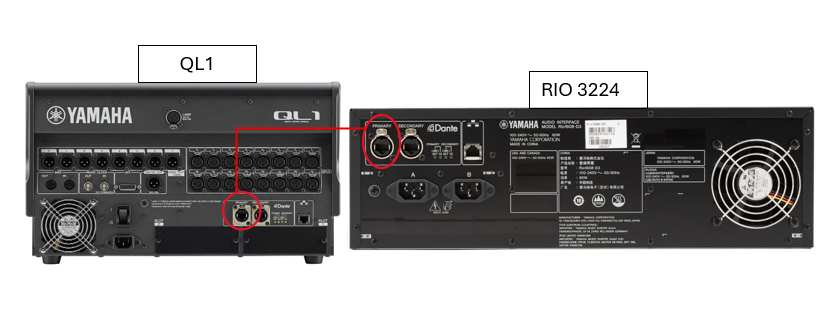
Cable connections
Using a cat5/6 cable, or preferably, a TourCat cable, connect between the QL1s Dante Primary Port to the RIOS Dante Primary Port.
QL1 Dante Primary > RIO Dante Primary
Common Device Settings
I’d like to take a second to go over common device settings that will be critical in setting up your Dante network.
· Device ID- Each device needs its own Device ID. For our purposes they will be in the format of Y001, Y002, Y003, etc. Our device Ids will be as follows.
o QL1: Y001
o Rio: Y002
· Sample Rate- All devices in your network will need to be set to the same sample rate to ensure good communication. While there are benefits to using a 96k sample rate (Reduced latency and better high frequency digitization) we will be using a 48kHz sample rate, as our ULXD units do not support 96k.
· Bit Depth- Just like our sample rate, our bit depth settings need to match between all devices to ensure proper communication. The common options you will see are 24Bit and 32bit. Again, while a 32bit audio network has its pros (increased dynamic range), we will be using 24Bit as our ULXD units do not support 32-bit Dante networks.
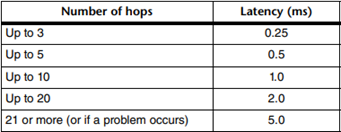
· Latency- For our devices to communicate properly they will need to share the same latency settings. The latency setting in a Daisy Chain Dante Network is decided based on the number of devices being used. Below is a chart showing this relationship. For our purposes we will use 1ms of latency. While we could go with less, this is a good balance of stability vs flexibility when configuring our network.
· Preferred Leader- For the clocking to work properly we will need to assign one device as the Preferred Clock Leader. If we have two devices set as the clock leader this will lead to issues in our network, usually in the form of audio dropouts. We will use the QL1 as our clock leader.
· Daisy Chain/Switched and Redundant Modes- For the Rio and QL1 we will be selecting Daisy Chain, for the ULXD it is named SWITCHED mode instead.
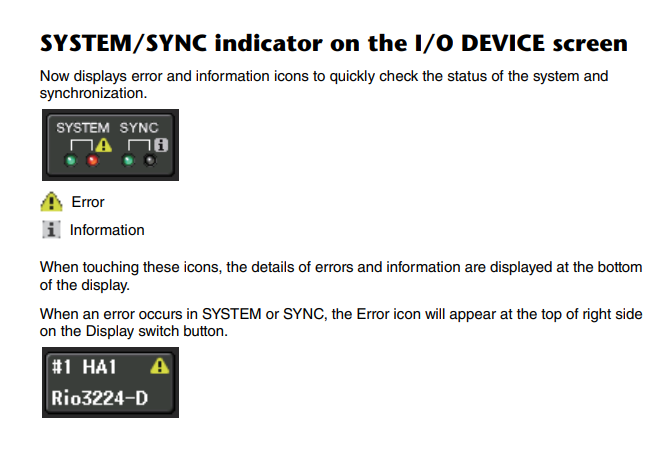
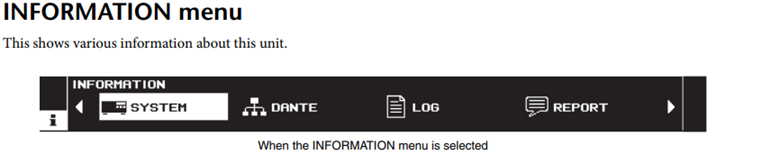
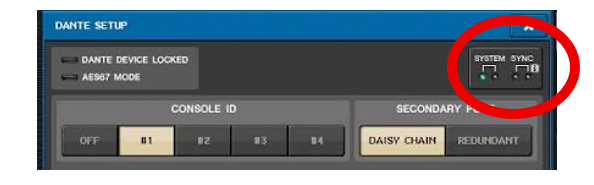
System/Sync Indicator
During any part of the process you can check the status of your network in the DANTE SETUP screen.
QL1 Setup
This page has multiple options that we will need to configure.
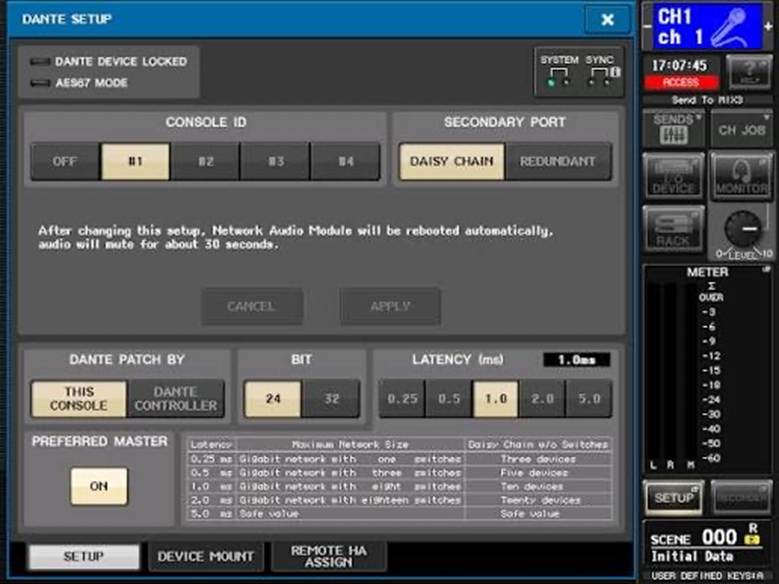
- Set the Console ID to #1. This will set our unit ID to Y001.
- Set the SECONDARY PORT setting to DAISY CHAIN
- DANTE PATCH BY: We can leave as THIS CONSOLE. If you plan on patching using Dante Controller, make sure to select that instead.
- Bit Depth we will set to 24Bit
- Our Latency we will set to 1ms
- Ensure that the PREFERRED MASTER is ON as we will be using the QL1 as our clock leader`
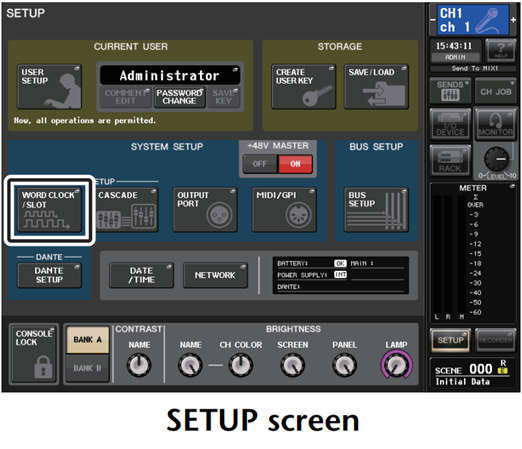
Next, we will need to set our Sample Rate/Word Clock Settings
We can do that by navigating to the WORD CLOCK/SLOT page from the SETUP screen
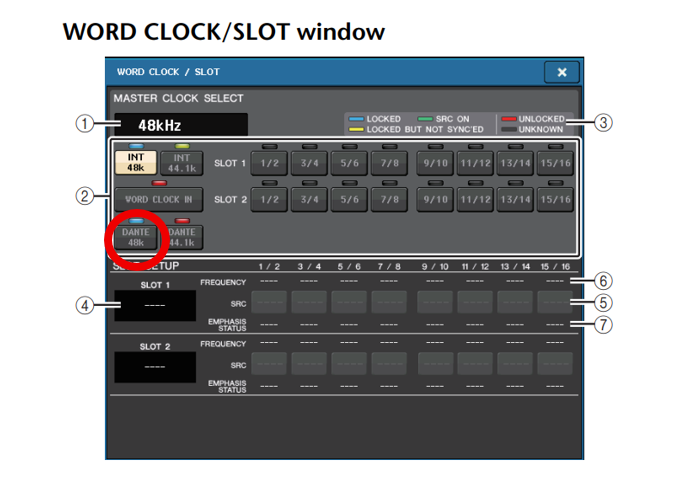
The only setting we need to verify here is that DANTE 48kHz is selected, which I have circled in red.
RIO Setup
Now we will move on to our RIO unit.
Note that this guide is for our RIO 3224 D2 units. For D3 units the process will be similar, but if you have difficulty please reference the Rio 3224 D3 manual.
Let’s access the SETUP Menu on the RIO. Press both arrow buttons at the same time until SETUP is highlighted.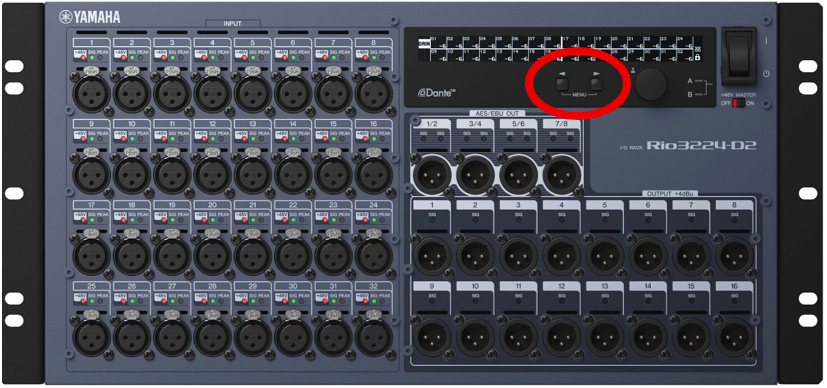
We will end up at the screen below. Use the arrows to scroll through the settings and push the rotary encoder in to make selections.
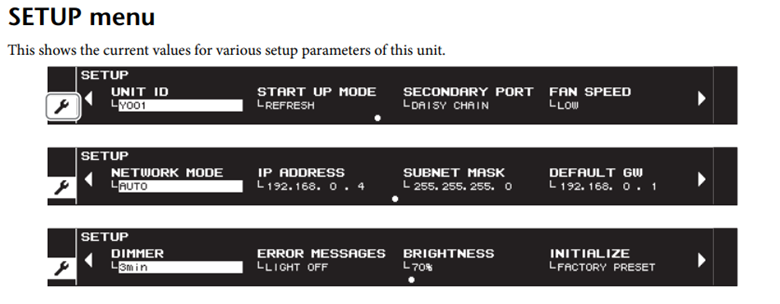
1. Set the UNIT ID to Y002 using the rotary encoder. (Remember our QL1 is Y001 and the device IDs cannot be the same)
2. For SECONDARY PORT select DAISY CHAIN
3. For NETWORK MODE select AUTO
Luckily the RIO should inherit the rest of its settings from the QL1, but we will verify them.
Arrow over to DANTE and select by pressing in the rotary encoder. Below is the SYSTEM screen and under that is the DANTE screen.
(To view the firmware versions and RIO Mode information use the encoder to select SYSTEM.)
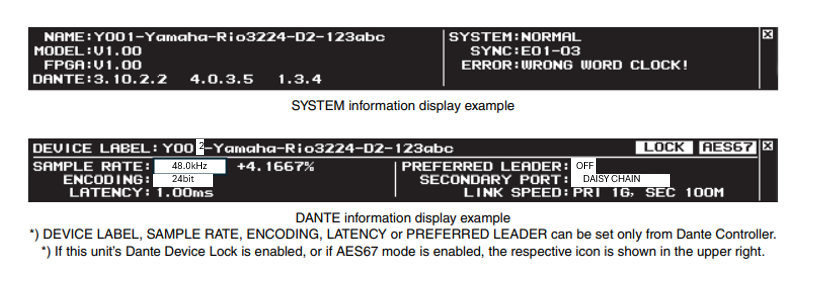
Verify these settings in the DANTE Menu:
- Sample Rate is 48kHz
- Encoding is 24Bit
- Latency is 1ms
- Preferred Leader is OFF (Reminder: The QL1 is our preferred leader)
- Secondary Port is DAISY CHAIN
- Link speed shows PRI 1G
If any of these settings are not correct, I recommend power cycling the unit and checking again. This would also be a good time to double-check your cabling and connection points. This would also be a great time to check the System/Sync indicator mentioned earlier. If the settings are still not configured correctly you will need to add a laptop with Dante Controller to adjust the device settings. If you run into this in the field and are unable to fix it, please contact the Audio Department Head for troubleshooting.\
Mounting
After verifying that our device settings are matched, we can move on to digitally mounting the RIO onto the QL1.
To access the DEVICE MOUNT menu, follow SETUP > DANTE SETUP > DEVICE MOUNT.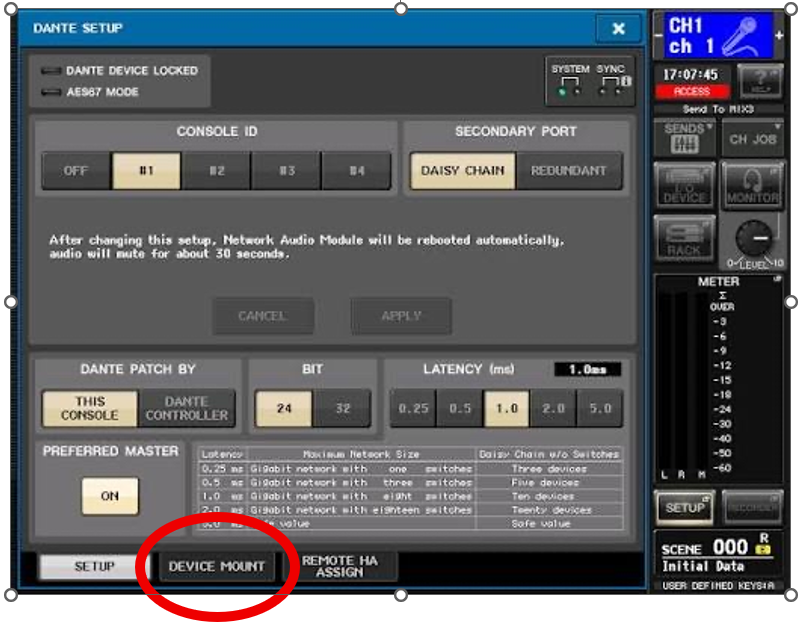
We will end up at the page below.
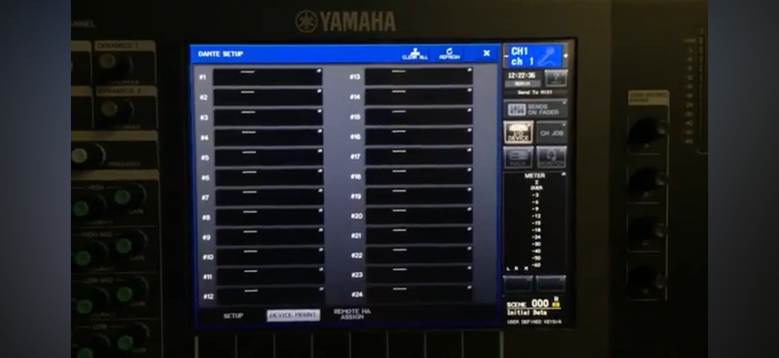
Select Slot 1 from the menu above.
On the next screen, select DEVICE LIST from the ONLINE Section
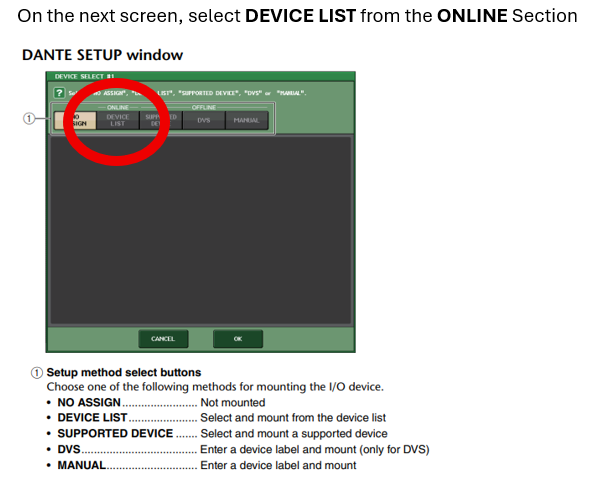
From here our RIO 3224 should be selectable as Y002. Scroll down until the device is highlighted and press OK. If the device is not available double check all settings and cable connections.
After successfully mounting the RIO, we will get a pop-up window letting us know that the device has been connected. We can also verify that the network is connected in the DANTE SETUP SCREEN pictured below. When configured correctly, you will see Green Lights for SYSTEM and SYNC on the first LEDs.
Patching and Routing
To access settings for patching and routing of our Dante device, navigate to the IO DEVICE tab on the Selected Channel View. Then find the tab at the top left labeled DANTE PATCH and select it.
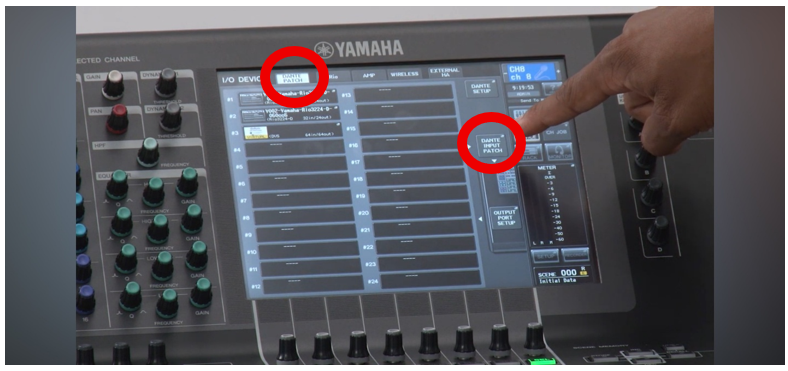
From here select DANTE INPUT PATCH
We now arrive at the patch points for the RIO
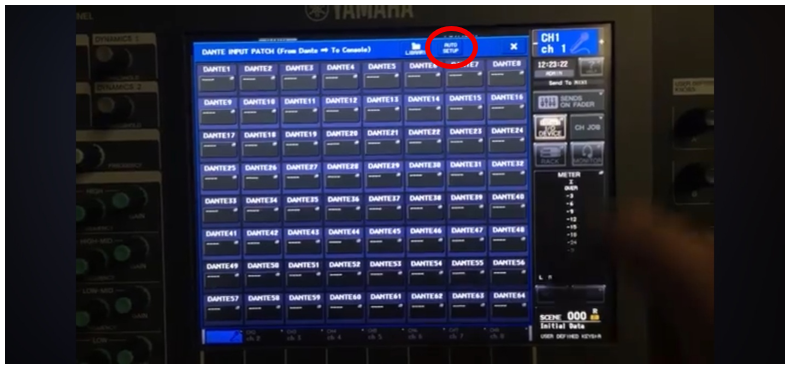
From here we can select AUTO SETUP, which will give us a 1- to- 1 patch for the RIO.
E.g. Dante Input 1= RIO Input 2, Dante Input 2= RIO Input 2, and so on. You can verify this as each input will start with Y002, our RIOs device ID.
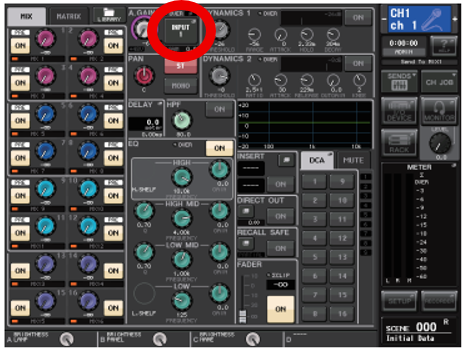
The only step left is to patch our QL1s Input channels into the Dante network.
After selecting the channel you wish to patch, use the touchscreen to select the input for that channel here.
For now, we will patch channel 1 of the console to channel 1 of the RIO rack. In this case select DANTE 1 from the input patch menu.
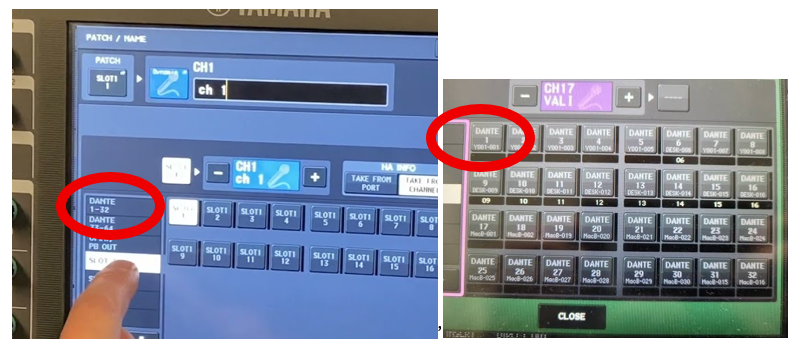
Note that the picture has Y001 device IDs. Ours will populate as Y002-001, Y002-002, Y002-003, etc… as our RIO is Device ID Y002.
Now, verify that audio is passing as expected. If you have signal at your input channel, and there are no dropouts or “Dante Clicks” and the System and Sync LEDs are green then you have successfully ran and programmed a basic Dante network!
If not, please go through this manual again and double check that all the settings are configured properly.
Below are a few troubleshooting tips as well.
Troubleshooting Tips:
· Firstly, you should check your cable connections to make sure they are secure. The RJ45 Ports should blink green and orange, indicating that 1G and 100Mb speeds are active.
· As long as all settings are correct a sequenced power cycle will fix most issues. Follow these steps.
o Power OFF all devices
o Power ON the QL1 first and allow it to boot fully
o Power ON the RIO and allow it to boot fully
o Power ON any other devices in the network (ULXD for example)
· In some instances, you may need to unmount and remount the devices in the QL1s DEVICE MOUNT page.
· If connection is still not being made or stable, you will need to connect Dante Controller to identify the issue in the network.