Shure Wireless Digital Conference System Guide
Shure Microflex Complete Wireless
 "Microflex® Complete Wireless empowers meeting participants to share ideas and make decisions anywhere. Advanced Shure wireless technology delivers reliable performance in any environment without complicated setup or cable limitations. Handsfree microphone activation provides touchless convenience for free-flowing conversations or choose manual or remote control for formal meetings."
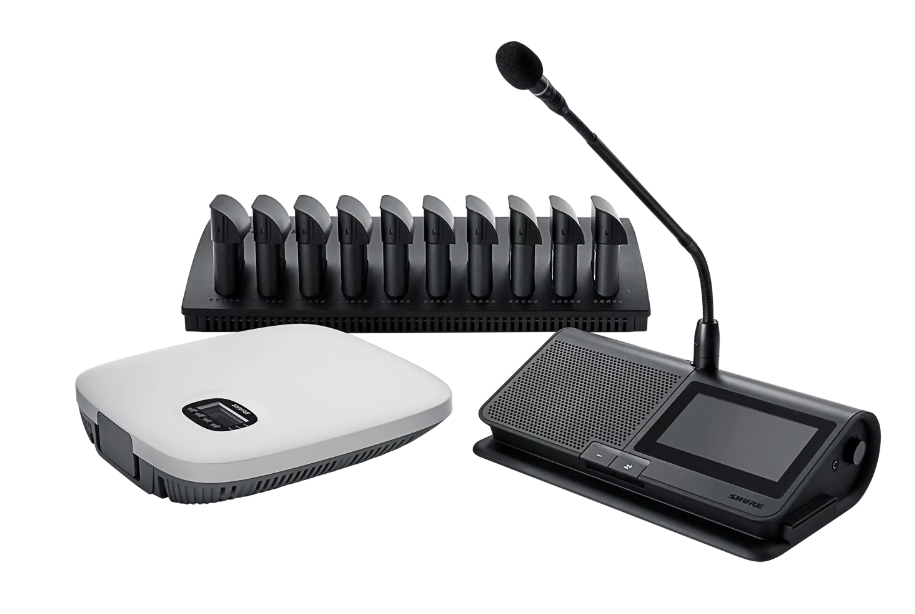
What's in the Box?
- Charging Station
- Access Point Transceiver
- Wireless Conference Units with Batteries
- Microphones
- Transceiver Mount
- Power Cable for Charging Station
- PoE Box for Transceiver
- Manual
Getting Started:
Step 1: Setting up Transceiver
- Place the Transceiver within range of the wireless units (150 ft.). See "Access Point Installation" for additional details.
- Connect the transceiver to a Power over Ethernet source to turn on. There is a white power supply that plugs into the wall, which you will also use to connect to a laptop.
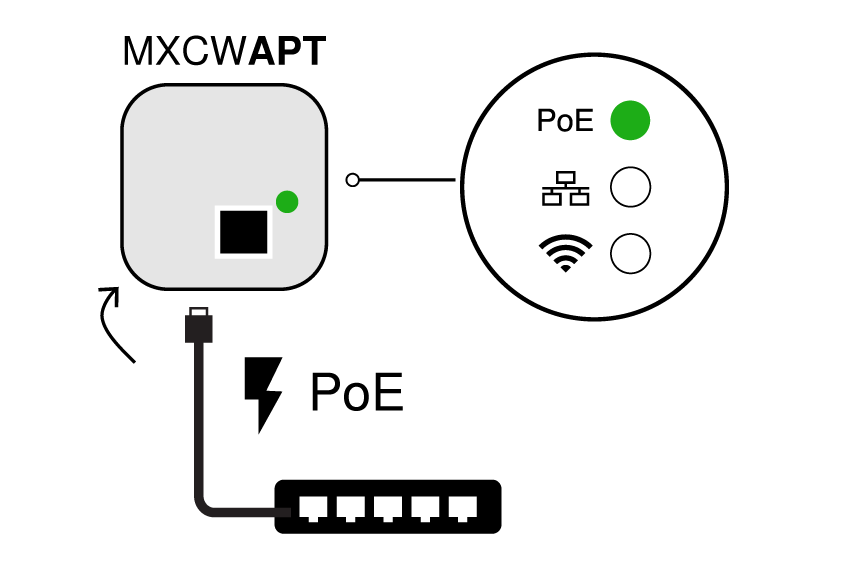
- RF Coordination will happen automatically once the unit is powered on. The Wifi light should turn yellow when it is ready to connect to the units.

Step 2: Setting up Wireless Conference Units
- Make sure your unit has a fully charged battery, and connect the microphone to the port on the top of the unit.
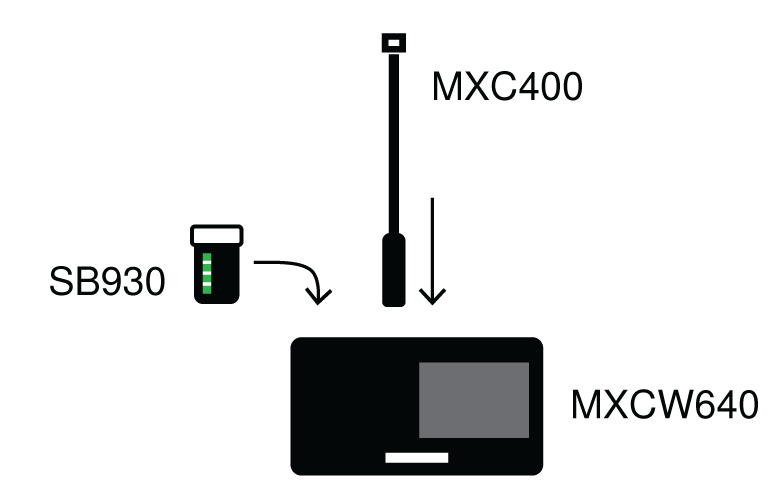
- Press and hold the power button on the bottom of the device until the screen powers on.

- The units are ready when the LEDs briefly flash green and the touchscreen displays the home-screen.
- Perform a soundcheck by pressing the
 speak button on one of the devices to activate the microphone.
Access Point Installation
Best Practices
- Direct the face of the access point toward the intended microphone coverage area.
- Position the access point in the same room as the conference units, and with an unobstructed line of sight to the microphones.
- Keep the device away from large metal objects.
- Keep at least eight feet between all access points.
- Mount with the XLR ports accessible, as it may be useful for connecting external equipment.
Unit Details
Hardware Features
- Loudspeaker
- Microphone Connector
- Only compatible with 10-pin MXC mics
- Headphone Connector
- Volume Control knobs
- Only works for connected headphones
- Battery Status Button
- Touchscreen
Using the Units
- When the units are powered on, you will see the home screen, which lists the active speakers and requests, and the settings screen, which will give different options depending on your role.
- To access the technician menu, go to the settings screen, hold both side knobs, and press the right side of the screen. This menu can perform some of the functions that are available to you in the web app, such as changing the role of individual units, or the left button functionality.
Web Application
The Web Application can give you the ability to monitor and control your system.
In order to open the Web App, simply connect your Transceiver to your laptop with a CAT-5 cable, then type the transceiver's IP address into your web browser (Only Google Chrome, Safari, and Internet Explorer are supported). Then sign in as an Admin.
Web App Views
There are three views within the Web App which you can switch between using the ![]() user dropdown in the upper right-hand corner.
user dropdown in the upper right-hand corner.
Admin: This view is for meeting setup and configuration. Use this view to manage Devices, Audio, Meeting Controls, and Wireless settings.
Chairperson: Use the Main tab for microphone control and managing speakers and speak requests during the meeting. Use the Voting tab to select the voting configuration, view and share the last voting results, and remove certain participants from a voting session.
Display: Display view shows the speaker list, request list, and voting results to meeting participants. Use this view to share a screen with the entire meeting space.
Within the Admin view, there are four main menus: Devices, Audio, Meeting Controls, and Wireless.
Devices:
- Identifying different units by sending a blinking light or tone
- Changing many different characteristics of the units such as:
- Participant's role which affects:
- Speaker limitations: The chairperson can speak at any time, while delegates may need to wait their turn.
- Speak priority: Participants can interrupt another active speaker depending on rank.
- Hardware controls: Button functions depend on the role of the speaker.
- Seat Name and Number which allows for easier identification of who is on what unit.
- Participant's role which affects:
Audio:
- Adjust audio settings for active microphones, inputs, and outputs such as:
- Gain, Auto Gain Control, Low Pass Filter, and High Pass Filter
- You can also group your microphones for easy muting of certain groups of devices
Meeting Controls: