Clear-Com HME DX410 Dual-Channel Wireless Intercom
DX410 Digital Wireless System
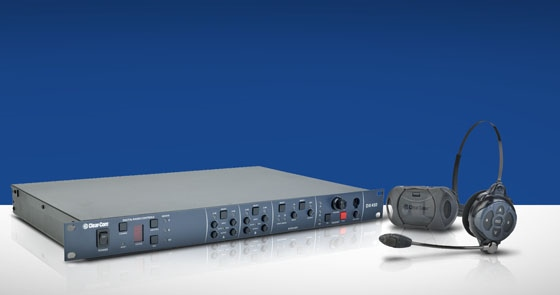
"Two-channel intercom system that operates in the 2.4 GHz wireless band with 2-wire and 4-wire bridging, and 2-wire auto-nulling."
Information taken from the DX410 User Guide
What's in the Box(es)?
BS410 Base Station Case:
- BS410 Base Station
- Antennas
- 110/240 Switching Power Supply
BS410 Beltpack Kit
- 5 Headsets
- 4 BP410 Belt Packs
- 4 AC50 Batteries
- AC50 Battery Charger and Power Supply Adapter
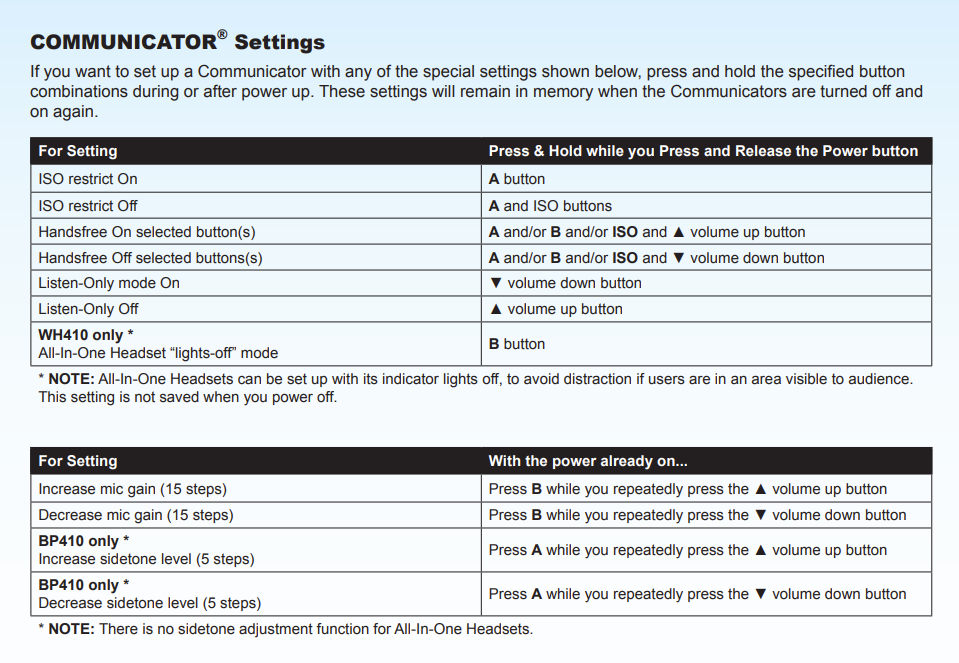
Getting Started
Base Station Setup
- Double check that your power supply and antennas are plugged in, and then power the base station on with the switch on the front panel. Your antennas should be positioned at a 90° angle from each other.
- Set the SINGLE/DUAL Channel select switch for the base station to operate in Single or Dual channel mode.
- In Single Channel mode, all wireless users will be able to hear each other. Up to four users can talk
simultaneously. - In Dual Channel mode, there are two separate audio channels enabling two groups of users to
independently communicate with each other. Up to three users can talk simultaneously. - NOTE: Any time the mode is changed, the unit must be reset using the RESET button or by power
cycling for the change to take effect.
- In Single Channel mode, all wireless users will be able to hear each other. Up to four users can talk
Belt Pack Setup and Registration
Setup
- Insert a fully charged battery in each Belt Pack with the metal contacts inserted first. Slide it in until it snaps.
- NOTE: The battery will not slide in if inserted incorrectly. Excessive force should not be necessary.
- NOTE: The battery will not slide in if inserted incorrectly. Excessive force should not be necessary.
- Plug the belt pack’s headset cable connector into each Belt Pack.
- To release the battery from the Belt Pack, press the button on the back side underneath the clip.
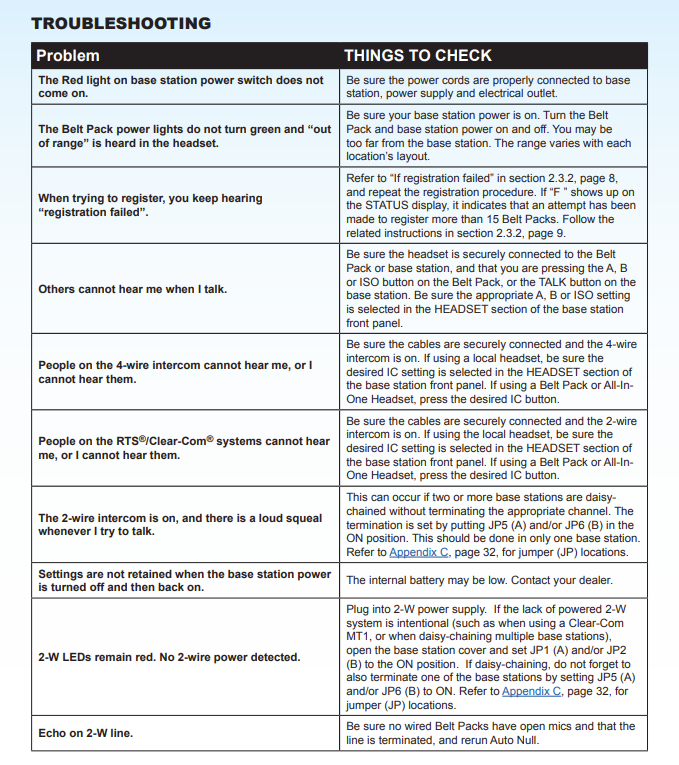
With our color-coded kits, the Belt Packs that come in the kit should already be registered to their respective base station. If problems should arise, this is the registration process.
The Belt Pack must be within 6 feet of the base station to enable registration.
1. Be certain all headsets to be registered are turned OFF, and the base station power is ON.
2. Place the headset on your head.
3. Press the REG button on the front panel of the base station. The STATUS display will show a
small “o” for open.
NOTE: If you wait too long before going on to the next step, the base station will exit
registration mode, requiring that you press the REG button again.
4. Press and hold the ISO button on the Belt Pack while you press and release the
Power button (PWR). After power up, release the ISO button. The Belt Pack will
enter Registration mode.
On Belt Packs, the two power lights at the corners near the A and B buttons will
begin blinking red, and then they will blink green two or three times then turn off.
Note: There may be a short delay.
If registration is successful, a voice prompt in the headset will say “Battery level, begin registration…”.
After a delay of about 15 seconds, the status display on the base station will show the ID number assigned to the
Belt Pack for about 10 seconds.
If registration fails:
-
-
- A voice message in the headset will say “Battery level, begin registration…” Both lights
on the Belt Pack will be blinking red, and there may be a delay of up to 90 seconds
before you hear “Registration failed.” - Press the RESET button at the lower-left corner of the base station with a pen or similar
pointed object. When the STATUS display becomes blank, press the REG button
and register the Belt Pack again. If registration fails again, call your dealer for
assistance.
- A voice message in the headset will say “Battery level, begin registration…” Both lights
-
Interfacing with Other Systems
The DX10 System has the capability to interface with 2-Wire and 4-Wire systems individually, or at the same time. You can cycle through each option with the SELECT button for each channel.
2-Wire Connections
- If using a 2-Wire connection, connect to your desired channel on the DX410 with the male or female XLR connection, depending on how you are connected to your other system, such as FreeSpeak or Helix.
- Depending on whether you are using a Clear-Com or RTS compatible 2-wire intercom system, position the red
CLEAR-COM / RTS button on the back of the base station as follows: In position = RTS Mode Out position = Clear-Com Mode - Press the SELECT button on the front panel of the base station for the channel that you are connecting. The 2-W light next to the button should turn green.
- NOTE: If no power is detected at the 2-W connector, the 2-W light will illuminate red and no audio will be
passed through. Plugging a connection into a Clear-Com or RTS power supply will turn the light green and
operation will begin.
- NOTE: If no power is detected at the 2-W connector, the 2-W light will illuminate red and no audio will be
- Make certain there are no open microphones on the wired intercom. If users are wearing headsets, please
notify them of the impending audio sweep prior to auto nulling. - Press and hold the AUTO NULL button on your channel for two seconds. To press the AUTO NULL button, insert a pen or
similar pointed object into the AUTO NULL hole on the front panel of the base station. An audio sweep will be
heard for 25 seconds on the wired Belt Packs. (The 2-W light next to the button should turn amber, then green.) - Adjust the 2-W intercom receive and send levels with the 2-W INPUT control and OUTPUT control for your channel.
4-Wire Connections
- If using a 4-wire intercom with the DX410, plug it into the 4-Wire connector of your desired channel.
- Press the respective SELECT button until the 4-W light next to the button goes on.
- Adjust the 4-wire intercom receive and send levels with the 4-W INPUT and OUTPUT controls for your channel.
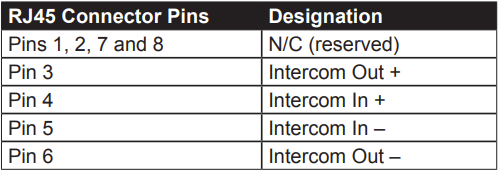
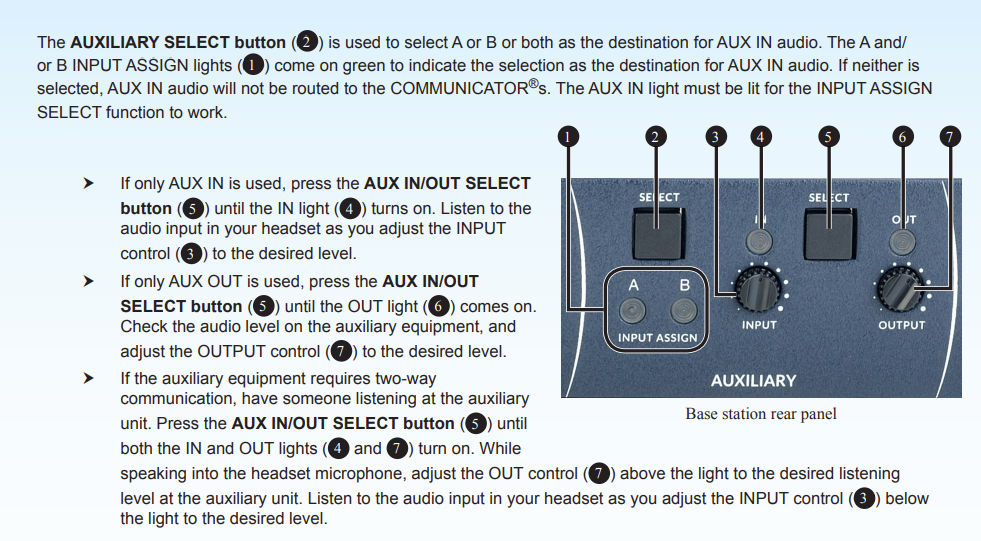
Interfacing with Auxiliary Equipment
You can connect other audio equipment to the DX10 system using the Auxiliary In and Out ports on the back of the base station.
Base Station Operation
Local Headset Communication
- On the right side of the front panel of the base station, there is a section for local headset communication. This section functions just like the belt pack, but in order to select what channel you are talking on, you need to toggle through the channels with the select button. Then the Talk button will enable you to speak on that channel. You can adjust your volume and Mic Level with the respective knobs.
Belt Pack Operation
- In order to Power the Belt Pack on or off, just press and hold the PWR button until there is a message saying "Battery Level" or all sound and lights turn off.
- The A, B, and ISO buttons can all be used to start communication with that channel. Press and hold one of these buttons to activate your microphone.
- Quickly tap and release a button to enter Hands-Free mode. This will latch your connection to the channel so that you can freely talk and listen. Attempting to latch to another channel will override the first channel you were latched onto.
- While in Hands-Free mode on channel A or B, ISO will act as a Push to Talk button. It will then revert to the originally latched channel.
- To unlatch, quickly tap the channel button again.
- Volume controls are on either side of the power button, indicated by up and down arrows.
- To adjust mic gain, hold down the B channel button and press the volume arrows up or down.
- To adjust side tone level, hold down the A channel button and press the volume arrows up or down.