Setting Wireless DMX Control
Turn on and reset your fixtures through the fixture's LED display.-
Open your Astera App.
-
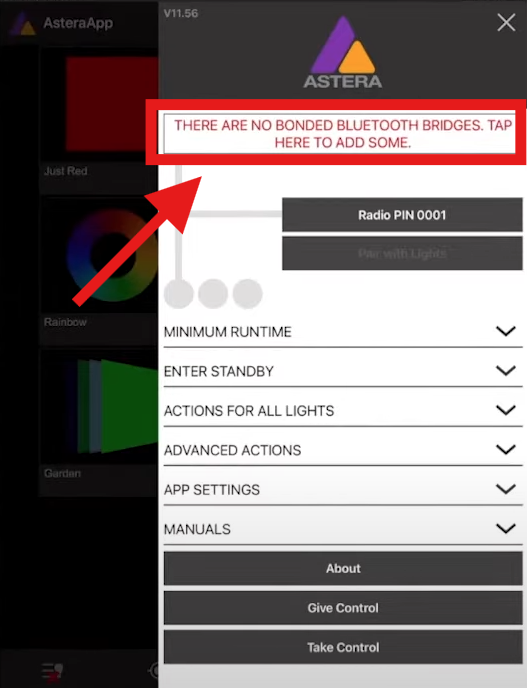
Add a Bluetooth Bridge.
a. Tap the 3 Lines on the top right of the app.
b. Tap the message at the top of the screen that says THERE ARE NO BLUETOOTH BRIDGES. TAP HERE TO ADDSOMESOME. If this message is missing and you are starting your first wireless DMX system, choose Manage Bluetooth Bridges, tap > on any leftover Bluetooth bridges, select Unbond and Delete. If you are starting a subsequent wireless DMX system, choose Manage Bluetooth Bridges, then tap the + on the top right of the screen.
c. Select the option to add an AsteraBox.
d. Turn on your AsteraBox. The blue APP indicator light should be blinking.
e. Press Yes on the App’s pop-up menu and a bridge should populate on the screen.
f. Choose to bond with your device,verifyingverify your AsteraBox and finding its pairing pin onitsthe back.
g. The AsteraBox will now appear under My Bridges.
h. If you receive a pop-up saying Another Astera System was found to use the same Radio Pin!, choose Ignore the Problem and proceed to Step 3. -
Change your radio pin from 0000 and remember your pin when setting multiple AsteraBox wireless zones. This step is particularly crucial if setting multiple wireless DMX zones.
a. Press Radio PIN XXXX under the AsteraBox status bar.
b. Set a new 4-digit value in the pop-up window and tap OK.
c. When you see the message saying You are changing the Radio Pin. Do you want to update your paired lights with the new Radio Pin, select No. This creates a new, unique wireless DMX zone. Please note that AsteraBoxes keep sending on the same pin until power-cycled. -
Pair your lights through the app.
a. On each fixture, hold down the power button until it flashes blue, indicating that it is in pairing mode. This can be done while lights are still in their case.
b. Tap Pair with Lights under the AsteraBox status bar.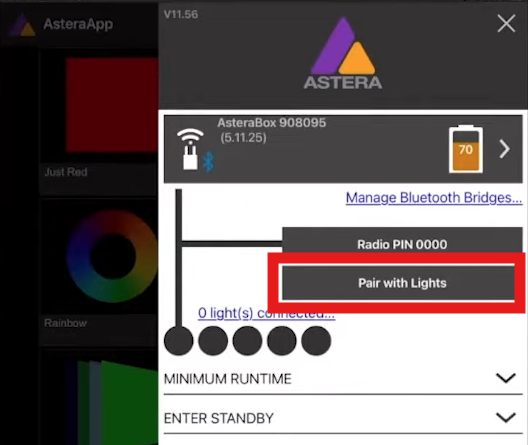
c. The app will show a status bar while it searches for fixtures to pair with. This bar indicates a pre-determined set of time, not the completed pairing of all devices, so you may need to run Pair with Lights multiple times.
d. If lights do not pair, unbond Bluetooth through the onboard display and try again.
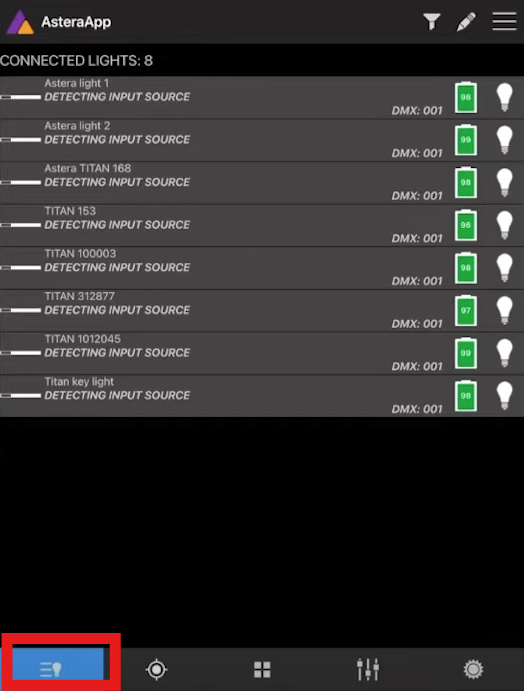
e. Your lights will populate in the Lights List page.
-
Set your battery settings/brightness.
a. Tap the 3 Lines on the top right of the app.
b. Scroll down to and choose Minimum Runtime.
c. In the drop-down menu, scroll left and right to choose your minimum runtime.
d. MAX indicates maximum brightness, therefore less runtime. -
Configure DMX settings for all fixtures.
a.SelectOn the Lights List tab,thenselect all of your fixtures.
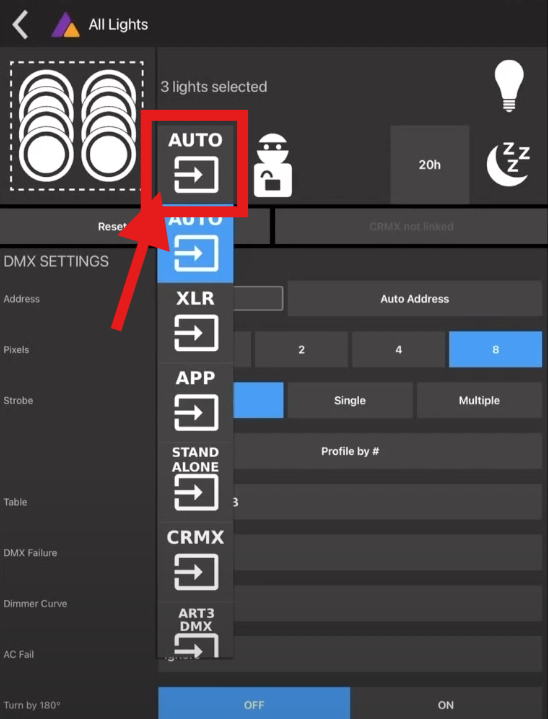
b. Tap the magic wand icon, which will appear at the top of your screen.c.YouOnwill be taken to the All Lightsmenu,menu.set
c. Tap Reset Light(s).
d. Tap Unlink CRMX, if applicable. If not applicable, you will see a grayed out CRMX not linked softkey.
e. Set your DMX profile by selecting the amount of pixels you want to control, strobe settings, and opening thed.f. You will be able to choose a specific profile through the table, such as RGB.RGBS or D16 X Y. There are 195 fixture modes, so be sure that your console has the mode you are looking for.e.g. Next, either set a single address for all of your fixtures or choose Auto Address and choose a starting address.f.h. Lastly, select AUTOmethod. For wired DMX control (even over Art-Net), chooseXLR. For wireless DMX control, choosemethod, CRMX.


Final steps if using wireless DMX (CRMX):
a. Connect the AsteraBox to your console using the included5-pin adapterDMX cable,to 1/8” adapter, then tap the green button on the top of your AsteraBox. Link should start flashing on the AsteraBox.AsteraBox, then go solid once it has made connections to all of your fixtures.
a. The app may take several minutes to indicate that the CRMX connection has been made to every fixture, though the fixtures should respond to CRMX right away.
b. Signal strength can be monitored by the app on the Lights List page. 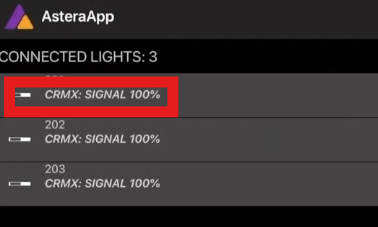
FinalIf stepssetting ifanother using wiredwireless DMX throughsystem, Art-Net:start again from Step 2.
a.