PTZ Remote Camera Controller
https://pro-av.panasonic.net/en/products/aw-rp150gj/
Panasonic PTZ Camera Setup
AW-UE160 + AW-RP150 | LAN Control Configuration
Prepared: April 20,28, 2026
1. Signal Flow
The diagram below shows the physical LAN signal path from the camera controller to the robotic camera. Two PoE+ injectors supply power to the devices over the ethernet cable, with an unmanaged switch bridging the two cable runs.
|
AW-RP150 Camera Controller |
LAN port → PoE OUT |
PoE Injector (PoE+ 802.3at) |
Data IN → Switch |
Unmanaged Network Switch |
Switch → Data IN |
PoE Injector (PoE+ 802.3at) |
PoE OUT → LAN port |
AW-UE160 Robotic Camera |
Both PoE injectors must be PoE++ (802.3bt) rated - standard PoE is insufficient to power the AW-UE160.
Injectors need to be set to BT. Power cycle the device if the POE injector toggle has been changed.
2. IP Address Configuration
Both devices must reside on the same subnet with unique IP addresses. The confirmed working configuration is as follows:
|
Device |
IP Address |
Subnet Mask |
|
AW-UE160 Camera |
192.168.0. |
255.255.255.0 |
|
AW-RP150 Controller |
192.168.0. |
255.255.255.0 |
Note: TheEvery camera initiallyand reportedcontroller anhas IPbeen ofset 192.168.0.11with viathere own ip address. It is labeled on the Easydevice. IPPlease Setupdon't Tool. Changing it to 192.168.0.10 viachange the camera'sip webaddress. GUI
3. Camera Webto GUI — InitialController Setup
Before4. Easy IP SETUP TOOL - Panasonic
1) If for any reason you need to go into the controllerthe couldEasy communicateIP withSETUP TOOL.exe for the camera,unit the followingusername stepsand werepassword completedare via the camera's built-in web interface. Note: on a brand new camera with no existing users, the GUI will prompt you to create the first user account before allowing any access..below:
1) Open the Easy IP Setup Tool (EasyIPSetUpTool.exe). The camera will appear in the device list.
2) Click the Web GUI button in the tool. This opens a browser window pointing to the camera's interface.
3) If this is a new camera with no users: follow the prompt to create the first user account. If a user already exists, log in with the existing credentials. For this unit — Username: markeys | Password: 2909.2909
4) Once logged in, switch from Live to Setup mode using the toggle at the top of the interface.
5) In the left navigation menu, scroll down and select Network, then choose LAN.
6) Under IPv4 Network Settings, update the IP address from 192.168.0.11 to 192.168.0.10 and save.
a) Note: If the camera has been on for 20mins you will have to power cycle it before updating these settings.
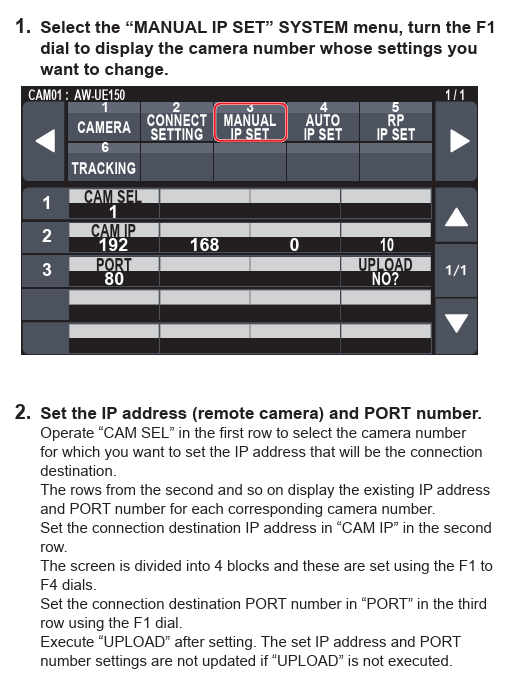
7) On the AW-RP150, set the Manual IP target address to 192.168.0.10 to match the camera. Control was then established.